.png)
How does the risk calculation work?
By default the system uses weights to calculate overall risk. Each indicator is calculated separately by multiplying the weight of the indicator with the risk score of the indicator (if the indicator has more than one score, the highest will be used).
Example:
● 100 * 5 = 500
● 100 * 9 = 900
● 50 * 3 = 150
Total risk/weight:
● 500 + 900 + 150 = 1 550
The total risk/weight is then divided by the total weight:
● 1 550 / 250 = 6.2
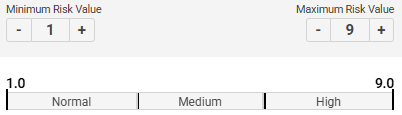
The overall risk is then defined based on the configured settings. The default settings would indicate a medium risk, just below the threshold for high risk. The thresholds can be adjusted to make this a high risk instead, like shown in this image.
LRM/HRM (Low Risk Multiplier/High Risk Multiplier)
The LRM (Low Risk Multiplier) or HRM (High Risk Multiplier) can be used to give certain values exponentially higher impact on the total risk score. When using the HRM, if the risk is greater than the middle value, the weight of the indicator will be multiplied.

Example:
Minimum risk is 1, and maximum risk is 9
● The middle risk value is 1 + ((9 - 1) / 2) = 5
If the risk value for an indicator is for example 7, the risk will be calculated like this:
● 7 - 5(middle value) = 2
● Adjusted value (AV) = 7 + (2 * 2) = 11
Final risk of the indicator will then be:
● AV * (AV / 8(depending on HRM level, see below)) = 15.1
● Final risk/weight: 100 * 15.1 = 1500
The final level of HRM will set the weight to (max risk * 100) to ensure the total risk is always high. This can be used when for example a PEP-hit should override the total risk score.
The LRM works the same but for values lower than medium.
Constant values for different HRM levels:
● 20 = 48
● 40 = 32
● 60 = 16
● 80 = 8
When using HRM/LRM the weight can not be 0, and will be set to 10 if the value is 0
in the settings area.